Converting Embroidery Files with BuzzXplore
When we need to convert an embroidery file to some of the most popular machine embroidery formats we often use BuzzXplore from Buzz Tools.
Not only is BuzzXplore very easy to use (it works and looks like Windows Explorer), the conversions are accurate.
BuzzXplore does a whole lot more than convert embroidery files though. It's a complete embroidery design management system. You can try it for free for 21 days and that's more than enough time to wonder how you ever got along without it.
This pictorial will show you just how easy it is to convert your designs with BuzzXplore.
Open the program and browse to your folder. In the image below we have our main design folder highlighted on the left.
The pane on the right displays all the subfolders.
The pane on the right displays all the subfolders.
We like Xplorer Mode and Thumbnails but you can see there are a lot of other options under the View menu.
That way you can configure BuzzXplore to your preferences
That way you can configure BuzzXplore to your preferences
Now we simply navigate to the folder containing the design we want to convert.
Click on the design to highlight it and tell BuzzXplore that is the one you want to work with.
After clicking Convert Embroidery Files… the dialog box below pops up.
We've selected DST from the dropdown and told the program what other options we want.
Then we'll click Finish. (Clicking Next gives you some other Conversion Options regarding splitting a design if needed.)
We've selected DST from the dropdown and told the program what other options we want.
Then we'll click Finish. (Clicking Next gives you some other Conversion Options regarding splitting a design if needed.)
This confirmation box appears next.
If you made a mistake you can go back and fix it here, if not click Finish.
If you made a mistake you can go back and fix it here, if not click Finish.
And quick as that the design is converted and named.
The .rgb file was created by BuzzXplore and is used to read certain files. Don't delete it!
The .rgb file was created by BuzzXplore and is used to read certain files. Don't delete it!
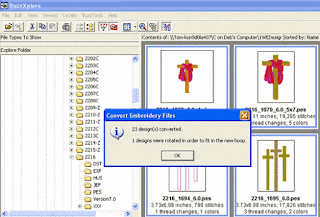
BuzzXplore is also smart enough to know if a design needs to be rotated to fit.
After converting the design below to XXX format it let us know that it was rotated to fit.
After converting the design below to XXX format it let us know that it was rotated to fit.
And it even displays the rotated design for you.
If a design needs to be split BuzzXplore takes care of it as it did for this design in PCS format.
The split design is even logically named with the individual file details added.
The split design is even logically named with the individual file details added.
Now let's convert a folder full of designs. Below we have navigated to a folder of a set.
Here we have clicked on the PES folder to highlight it…
…and double-clicked to open it.
We're going to convert all the designs in the folder so we choose Select All from the Edit menu and…
We're going to convert all the designs in the folder so we choose Select All from the Edit menu and…
… all the designs are then highlighted.
We don't want the converted files to be in the same PES folder so we've clicked on Other Folder in the dialog box below. Now we can tell BuzzXplore where to put the converted files.
We want them in the DST sub-folder we created in the 2216C folder so we've browsed to it and clicked on it.
Our confirmation box appears. Everything is correct so we click Finish.
And that's it! 23 designs converted in the blick of an eye.
Try it yourself. Download the free 21 day trial of BuzzXplore here.


BuzzXplore is just an awesome place for converting embroidery digitising files with lots of Buzz tools. I just love it.
ReplyDeleteI've read this blog, this blog is very informative and great blog for Embroidery Digitizing
ReplyDelete